Design Team Day!

#31
Challenge:   Prima Doll Challenge 
August 6 - 12th, 2013

Prima Doll Stamps created by Julie Nutting are all the rage right now.  There where five new stamps just release last month and a little set of angelic wings and whimsical boarders.  So this weeks challenge is to create something using the Prima Doll Stamps. 

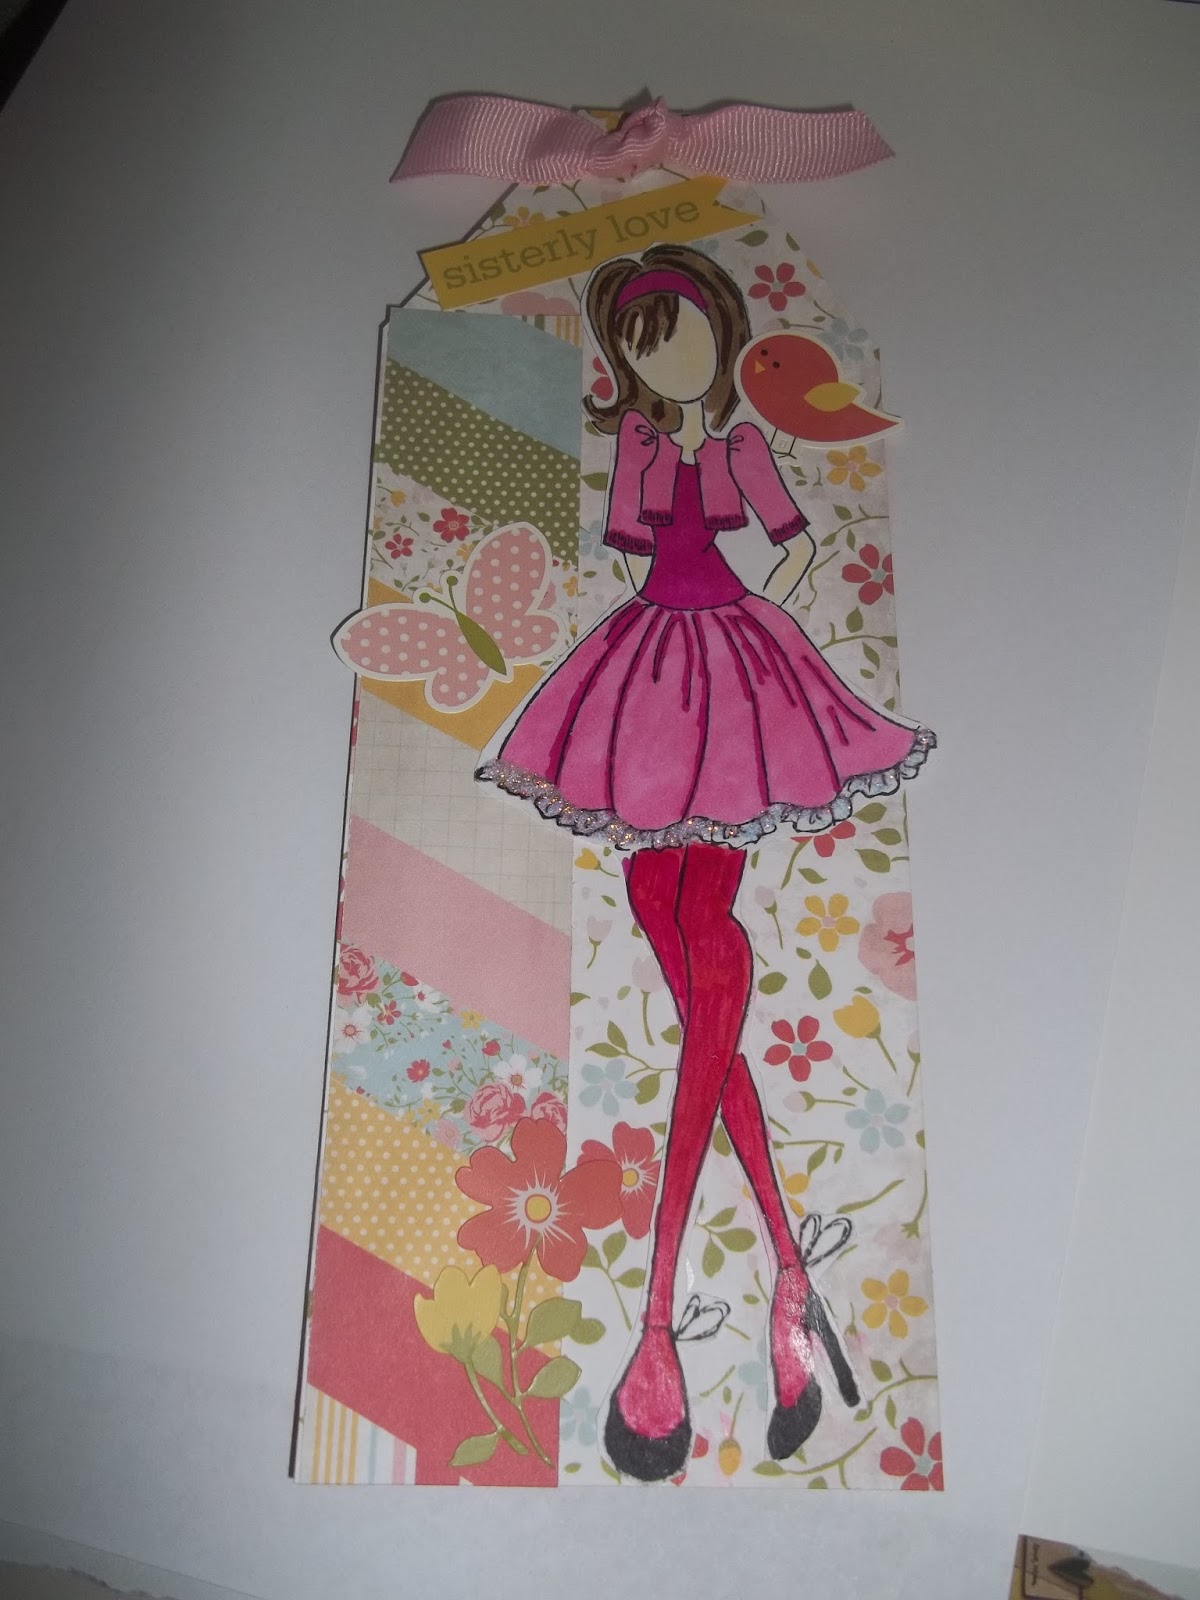
 I wanted to get in on this challenge however, I am going to tell you right up front...I flunked coloring in both Pre-K and Kindergarten...and it didn't get much better from there! But, I love these doll stamps and wanted to try my hand at them. A friend stamped hers for me so I could be in on this challenge. 

Well, here is how things went! First let me tell you I have all the coloring tools a gal who doesn't color well could want....colored pencils! Two kinds to be exact! Stampin Up markers...the entire collection mind you! Bic markers, and even some Close to My Heart markers. In that entire collection of markers not one...no not one marker that was exactly the right color for flesh! 

I started out with a pale flesh colored pencil...not exactly right, so then I tried to correct it with various other colors on her legs...well that did not go very well so she is wearing tights! And not exactly the right color I may add to go with her outfit. But remember how I said a friend stamped it for me? Well you got it...she only stamped 1! 

Anyhow, I was kind of pleased with the rest of the coloring...flesh color is still a little off but overall pleased. She is going to go in a scrapbooking paper collection called "Sisters" from Echo Park. It is a present for my sister later this year when I get to go visit her for 2 weeks when she moves into her brand new house. I get to design, set up, and decorate her scrapbook room. So excited about that!!


Hope you enjoy all the creations this week. Make sure to check out Cuttin' and Stampin'  for all your inspiration.

You can purchase your Prima Doll Stamps from Teresa at Scrapping For Less.


Craftin Desert Divas!


I am posting today as a guest designer for Craft It Up & Link It Up Linky Party hosted by Tara of Craftin Desert Divas! Every other Monday will mark the beginning of a new semi-weekly linky party and you could win fabulous prizes!!

This linky party theme is Back to School. The sponsor is Candice Fields. The more you link up, the better chance you have to win.  Visit Craftin Desert Divas for all the rules and to play along.


Here is what I created for this linky party....

It really is Back to School around here...my grandchildren go back to school on Wednesday of this week. I created a little gift for the 3 younger ones that are in elementary school to take on the first day. All 3 are identical so I only photographed one of them. I can't wait to see all of your wonderful projects. And if you are looking for ideas check out Pinterest...there are some fabulous ones there.

I used green and red washi tape to go around the vase (I had a ribbon tied around at first but did not like that at all).
Then, I cut this cute apple from the Cricut cartridge "Preserves" and adhered it to the front of the vase.
Finally, I filled the vase with colored pencils.


Hope you will Craft It Up & Link It Up!!!

Bee-Utiful Summer Blog Hop Day 2!

Weren't all of those projects from yesterday amazing!!! I am so honored to be among such talented ladies. Thanks so much to Lisa for putting this hop together and for allowing me to be a part of it.

If you did not begin at Lisa's blog please go back there and start from the beginning. There are some amazing prizes and sponsors for this hop! Make sure you follow all the criteria to be eligible for those wonderful goodies.

For today's project...I have another picture for my bathroom...I had hoped to get it completely finished but that did not happen. I painted another frame the same color as the ones from yesterday and then created this digital image to go in the frame...I added texture, and overlays, and text to the picture. Top priority this week is to get this bathroom completely finished decorating...I really need to get back to posting more on my blog to so come back on Friday for an update...I am declaring Fridays as Finishing Friday....so every Friday from this point on I will have a post where I talk about finishing a project. First up will be the bathroom.

Here is my photo I will be putting in the frame. I also created another photo...I may consider doing this one...just not sure.


Now hop on over to Diana's blog to see her awesome summer project.
Here are the awesome prizes that are available:

The following is a list of all buzzing sites that have been so generous and are sponsoring this blog hop, Bee-utiful Summer Blog Hop, August 3rd and 4th, so follow the rules Lisa has set for BLOG CANDY!!  

Royal Prize Pack from Theresa TheScrapbooking Queen

$15.00 Gift Certificate from KaDoodle Bug Designs

$10.00 Gift Certificate from Treasure Box Designs

$20.00 Gift Certificate from Little Scraps of Heaven

$10.00 Gift Certificate from Designs on Cloud 9

Stamp Set of winners choice from Paper Sweeties

Large custom handmade keychain the winners choice 
of style and color from Chelle's Custom Designs

$15.00 Gift Certificate from Too Cute by Jessica

A gift valued at $10.00 from Lettering Delights

And here is the whole lineup:

Bee-utiful Summer Blog Hop


You are here for the Bee-utiful Summer Blog Hop. Please go to Lisa's blog to start. I cannot wait to see all of these awesome summer projects. You should have come from Sarah's blog.

I needed a Bee-utiful summer project for this blog hop. Thank goodness for these cause they help me get things done that I would like to do and help with motivation! So thank goodness for blog hops! So, I redecorated my bathroom about a year ago into a beachy themed bathroom. Well I have been meaning to add to the store bought items with some hand made ones ever since then. So here is phase 1. I will be showing you two pictures that I created to hang over the back of the toilet.

First, I sanded and painted some old picture frames, then I used Life is a Beach Cricut cartridge to cut the shells for the one frame and the light house for the other frame. I love how they turned out. Come back tomorrow to see the rest of the beachy decor in my little bathroom. 


Now hop on over to Diana's blog to see her awesome summer project.


Design Team Day!

#29
Challenge:   Scrap your Vacation
July 23 - 29


And we're going on vacation!!! This week is all about Scrap Your Vacation! Well, I thought it would be really cool to actually have my post about vacation while I am on vacation! I am currently in the state of North Carolina visiting with family. It has been over a year since I have seen my dad or my precious cousin that I love as a sister! So, anyway this layout is of the last time I was able to visit a little over a year ago when my cousin's baby girl got married. I so love being with my family. I felt sooooo blessed to have been able to go to this wedding.


This is just 1 of the dozen layouts I did of this wedding to go in my scrapbook. Please forgive my terrible photo taking skills...my good camera is on the fritz so I am having to deal with this little point and shoot for a while. 


So, enjoy and don't forget to show us your vacation layouts or cards. Check here to go see all the inspiration from my Design Team sisters for this week.


Design Team Day!!


I whipped up this cute little card from an image in my stock of cut images I keep on hand to make quick cards! I used the Paper Smooches stamps "Chit Chat" for the sentiment and "Geo-Graphic" for the background. I also used some pink and white twine to tie around the card. Hope you enjoy!


So come on over to Cuttin and Stampin and see all the great ice-cream creations we have for you this week!


Design Team Day!

#26
Challenge:   Independence Day
July 2 - July 8, 2013


 I decided to make a little home decor project for you today. 


A close up of one of the flower clusters

Supplies:
Straw wreath
Material Strips cut 3"x 18" 
Accent Essentials Cricut Cartridge
Pearl Spray Mist
Straight Pins
Bazzill 4th of July printed paper
Various red, white, and blue ribbon


Step 1: I wrapped the wreath with the printed material strips and pinned them onto the straw form. 

Step 2: Cut 4 different size/patterns of 6 petal flowers from Accent Essentials.

Step 3: Layer together and begin scrunching and folding to create the rumpled look of the flower. Layer another flat flower of similar or contrasting color in the middle and secure all with a brad.

Step 4: Make various size bows with ribbon and pin in place.

Step 5: Pin paper flowers to the wreath form.


Hope you enjoy! Can't wait to see what you come up with for Independence Day!!!

Make sure you head over to Cuttin' and Stampin' to check out all of the Independence Day Projects this week...and make sure you enter the challenge!